 ETW

Most traders who struggle with order blocks are not short of information. They are drowning in it. Breakers, mitigation blocks, rejection blocks, propulsion blocks, and a dozen ways to draw each one. By the time you have finished labelling the chart, the move is gone.
This post goes the other way. Two timeframes, M15 and H1, one definition, one entry, two stop options and a clear target. It is a simple order block model, kept simple on purpose so you can actually trade it, journal it and find out if it works for you.
What an order block means in this model
Here is the only definition you need for this post:
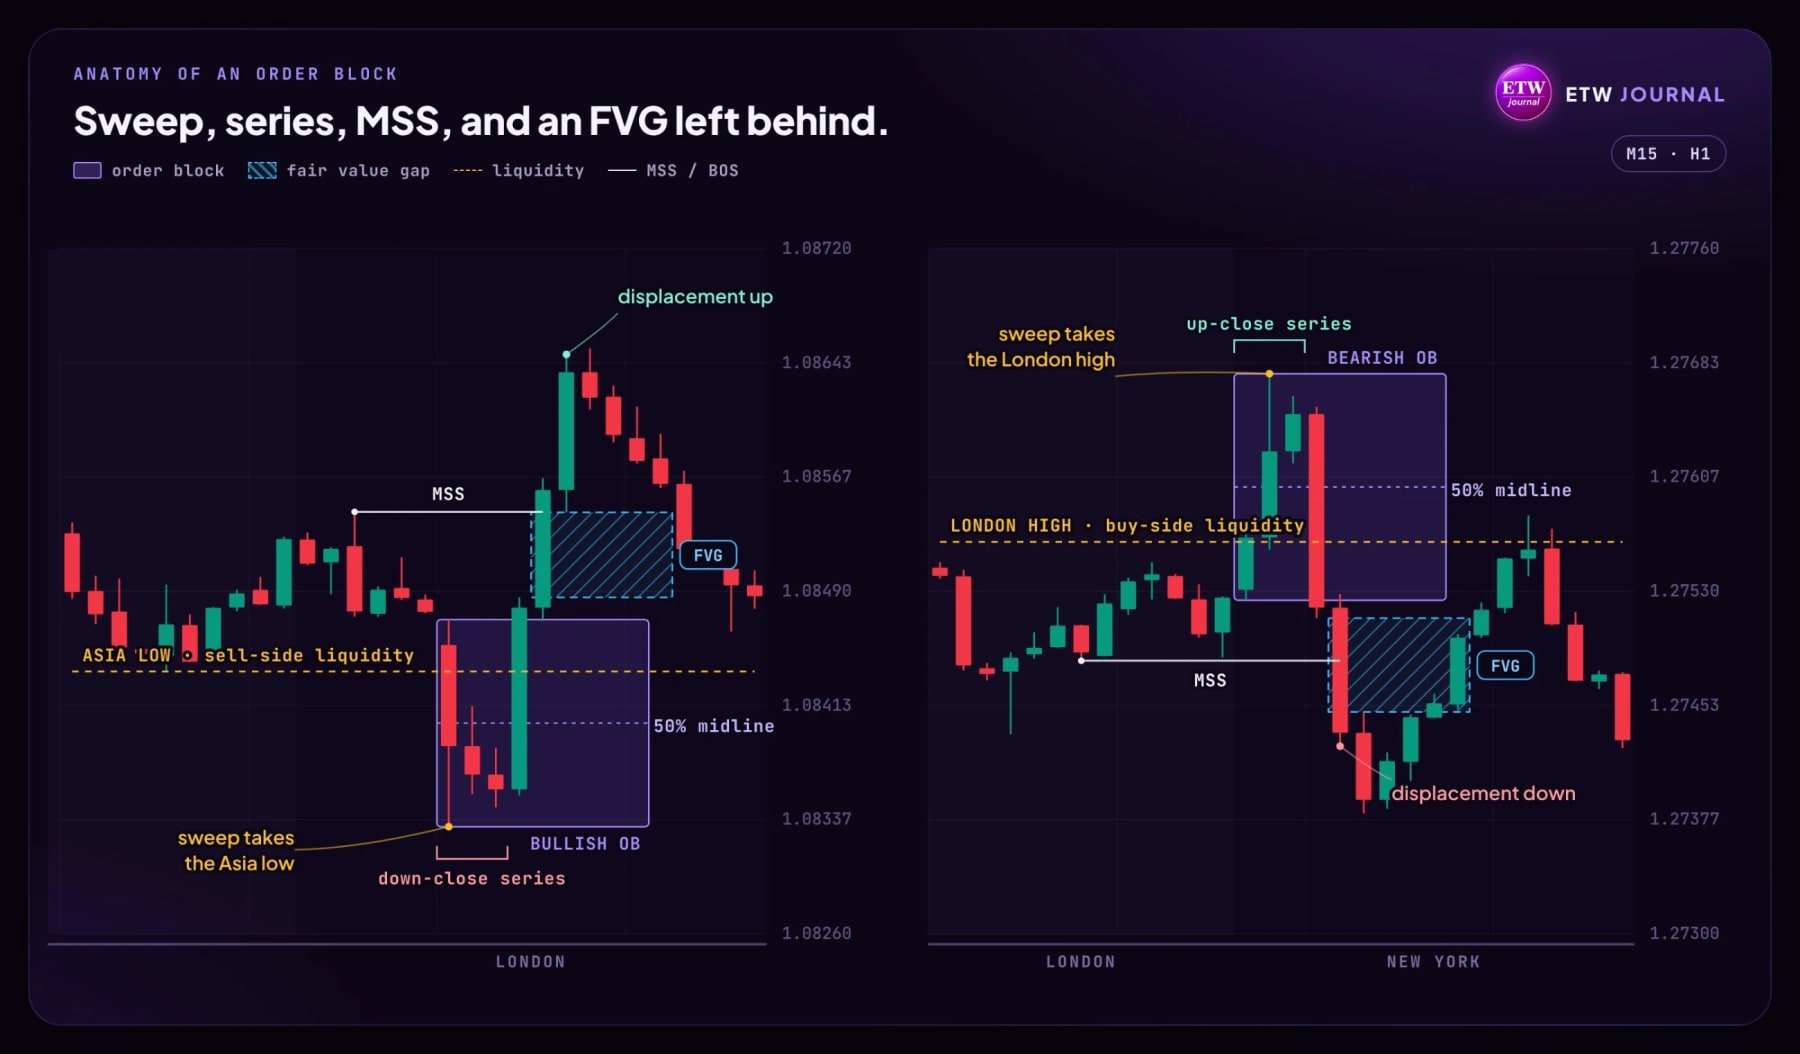
An order block is a series of up-close or down-close candles that forms right after a liquidity sweep.
Two parts matter. First, the sweep. Price has to run through a level where stops are sitting, like the Asia low or the London high, and fail to keep going. Second, the series. At that sweep you will usually see two, three or four candles closing in the same direction as the sweep. Those candles are the block.
- Bullish OB: sell-side liquidity is swept, and the series is made of down-close (red) candles. Price then displaces up and away.
- Bearish OB: buy-side liquidity is swept, and the series is made of up-close (green) candles. Price then displaces down and away.
Draw the block from the highest high of the series to the lowest low of the series, and mark the 50% line through the middle. That midline is going to matter when we talk about stops.
If there is no sweep before the candles, it is not an order block for this model. A run of red candles in the middle of nowhere is just a pullback. The sweep is what tells you somebody used those stops to fill a position.
M15 or H1: how to use both
The model is exactly the same on both timeframes. What changes is the size of the move and how often it shows up.
- H1: fewer setups, bigger blocks, cleaner moves into PDH or PDL. The stop is wider, so size down. Good if you cannot watch the whole session.
- M15: more setups every session and tighter stops. Targets are usually the Asia or London range, and sometimes the PDH or PDL.
The best way to use them is together: H1 for direction, M15 for the trigger. When the H1 sweeps a level and gives you an H1 order block with an MSS, wait for price to come back into that H1 block. Then drop to M15 and wait for the same pattern to form inside it: a small sweep, a series, an MSS and ideally an FVG. You keep the H1 target but use the M15 stop, so the reward to risk gets a lot better.
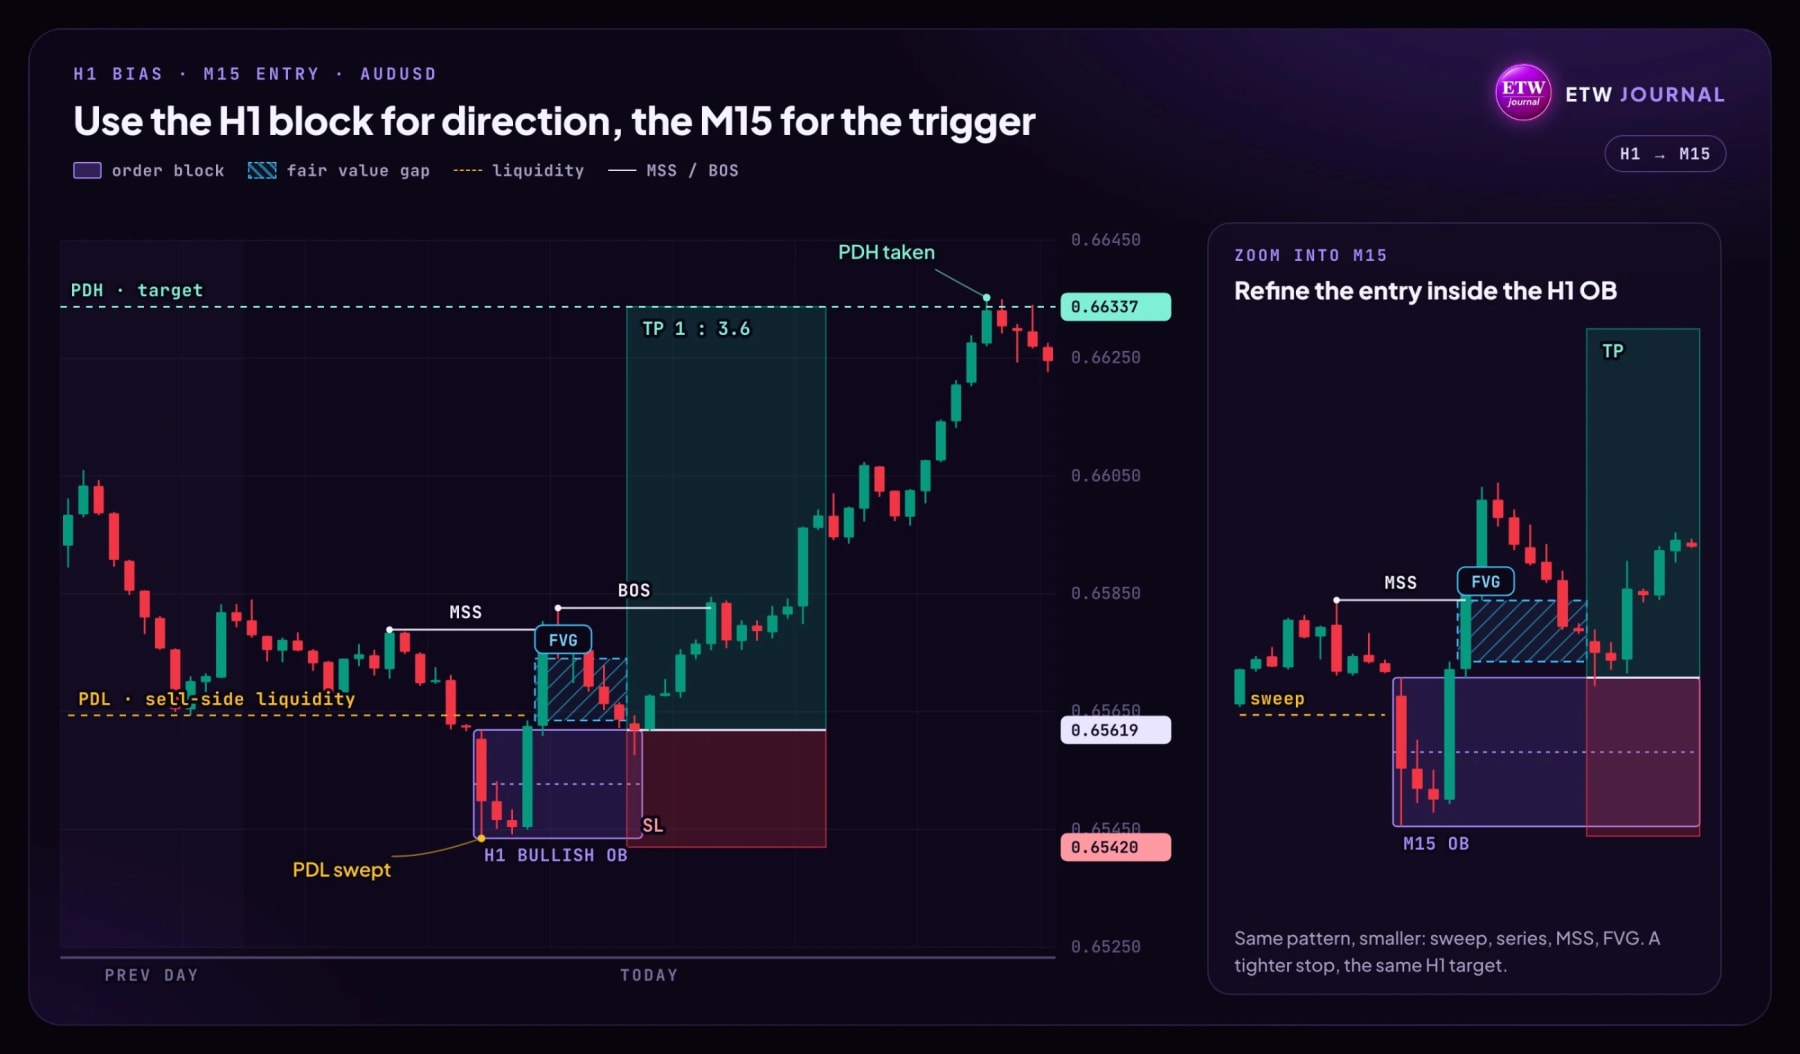
One rule keeps this clean: if the two timeframes disagree, H1 wins. Do not take an M15 long straight into a fresh H1 bearish order block, and do not short an M15 block that sits inside an H1 bullish one.
Step 1: Mark the liquidity before London opens
Everything in this model starts with knowing where the stops are. Before the session, mark these levels on your H1 chart. They carry straight down to the M15:
- PDH and PDL: the previous day high and low.
- Asia high and low: the range built during the Asian session.
- London high and low: once London has printed its range, these become the levels New York likes to raid.
That is it. You do not need weekly levels, ten trendlines and three Fibonacci tools. These six lines give you both halves of the trade: the level that gets swept to create the block, and the level on the other side that you are going to target.
Use Session Prep in ETW Journal to write these levels into your game plan before the session. If they are not written down before price gets there, you will draw them after the fact and fool yourself.
Step 2: Wait for the sweep
A sweep is simple. Price trades through one of your marked levels, takes the stops sitting there, and then fails to hold beyond it. On M15 this often looks like a candle that wicks under the Asia low and closes back near or inside the range, or a few candles that poke above the London high and stall.
Do not try to predict which side gets taken. Let price show you. If the Asia low gets taken first, you are looking for longs. If the London high gets taken, you are looking for shorts. Your only job here is patience.
Step 3: Find the series and confirm with an MSS
Once the sweep happens, look at the candles that formed it. For a bullish setup you want the last run of down-close candles at the low. For a bearish setup, the last run of up-close candles at the high.
Then wait for displacement: strong candles leave the block and break the last swing point before the sweep. That break is the market structure shift (MSS). For a long, price closes above the last lower high. For a short, it closes below the last higher low. The MSS is your proof that the sweep worked. If price just drifts sideways after the sweep and never breaks structure, there is no trade. Walk away and wait for the next one.
The high probability filter: an OB with an FVG
Look at the candles that break structure. When the displacement is strong, it usually leaves a fair value gap (FVG) behind: a three-candle pattern where the wick of the first candle and the wick of the third candle do not overlap. On the charts in this post the FVG is drawn as a hatched blue box with a dashed border, so you can tell it apart from the solid purple order block.
An order block that has an FVG sitting right next to it is a very high probability setup. The gap shows that price left in a hurry, and the order block shows where that move started. When price comes back, it usually fills the FVG first and then taps the top (or bottom) of the OB, which is exactly where your limit sits.
- OB + MSS + FVG: the A+ version. This is the one to wait for.
- OB + MSS, no FVG: tradable, but smaller size or a stricter stop.
- OB with no MSS: no trade, even if there is a gap.
Later in the move you will often see a break of structure (BOS), where price breaks the next swing in the same direction. You do not need it to enter, but it is a good sign the trade is working and a sensible point to start protecting your position.
Step 4: Enter on the retracement back to the OB
You do not chase the displacement candle. You wait for price to come back.
- Long: buy at the top of the bullish OB, either the high of the down-close series or the open of its first candle (more on that below).
- Short: sell at the bottom of the bearish OB, either the low of the up-close series or the open of its first candle.
Using buy and sell limit orders at the open of the OB
You do not need to sit and watch for the retrace. Once the MSS has printed, you can set a pending order and let price come to you:
- Buy limit (bullish OB): place it at the open of the first down-close candle in the series. That open is the top of the block's bodies, the first price where the buyers stepped in.
- Sell limit (bearish OB): place it at the open of the first up-close candle in the series. That is the bottom of the block's bodies, where the sellers stepped in.
The open is a slightly deeper entry than the wick high or low, so you get a better price and a smaller stop, but now and then price will only tag the wick and leave you unfilled. That is fine. A missed trade costs nothing. Put your stop and take profit on the limit order when you place it, and cancel the order if price runs to your target without filling you, or if the session you planned to trade is over.
The first touch of the block is usually the best one. If price has already traded deep through the block and back out again, the block has done its job and you should not keep reusing it.
Where the stop loss goes
There are two sensible places for the stop, and both are fine as long as you pick one before you enter.
- Beyond the low or high that took the liquidity. For a long, a pip or two under the sweep low. For a short, a pip or two above the sweep high. This is the safer option. If price goes back through the sweep point, the whole idea was wrong.
- Beyond the midline of the order block. A tighter stop just past the 50% line. A healthy OB should not be traded through its middle on the retrace, so this still makes sense. You get a much better R for the same target, but you will get wicked out more often.
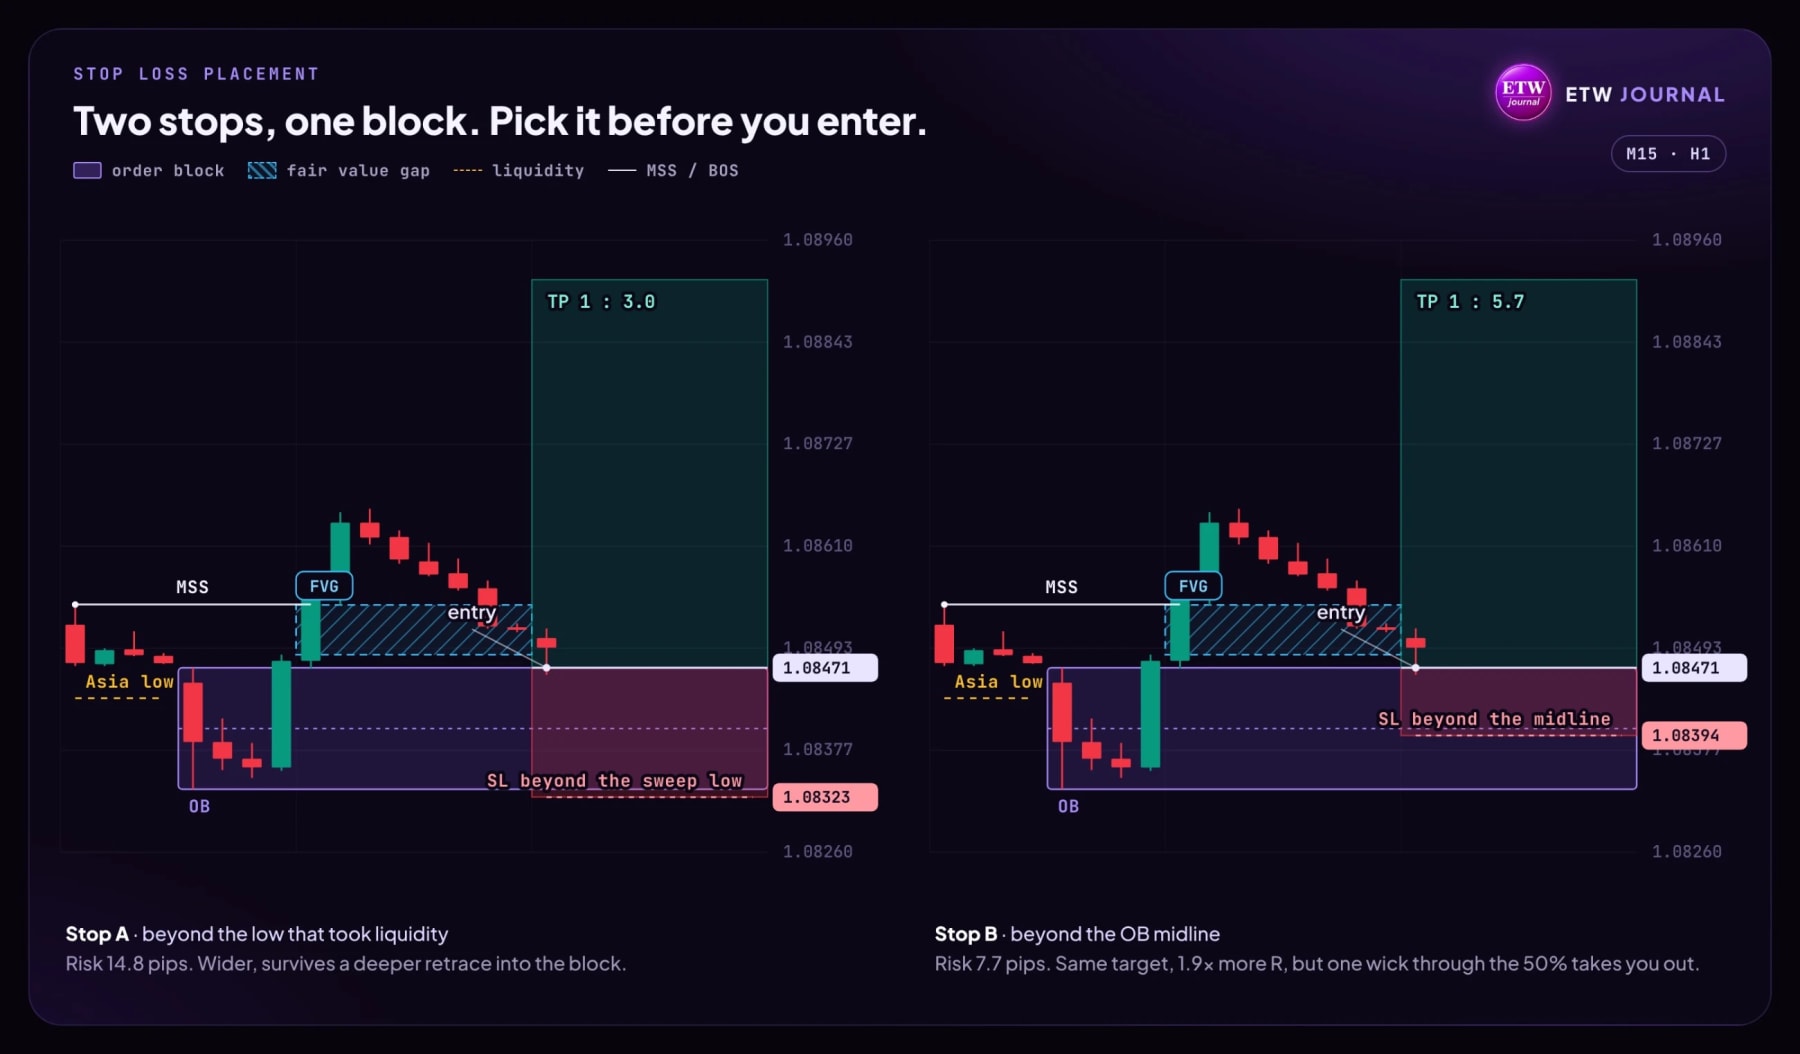
A rule of thumb: if the block is big compared to the move you expect, use the midline stop or skip the trade. If the block is small and tidy, the stop beyond the sweep is usually cheap enough already.
Where to take profit
The target is the liquidity on the other side. If you were long from a sweep of the lows, you are aiming at the highs. If you were short from a sweep of the highs, you are aiming at the lows.
- Longs: Asia high, London high, PDH.
- Shorts: Asia low, London low, PDL.
Pick the nearest clean pool as your first target and the bigger one as your final target. Taking partials at the first pool and moving the stop to break even is a simple way to stay in the trade without giving everything back.
Long projection: EURUSD on M15
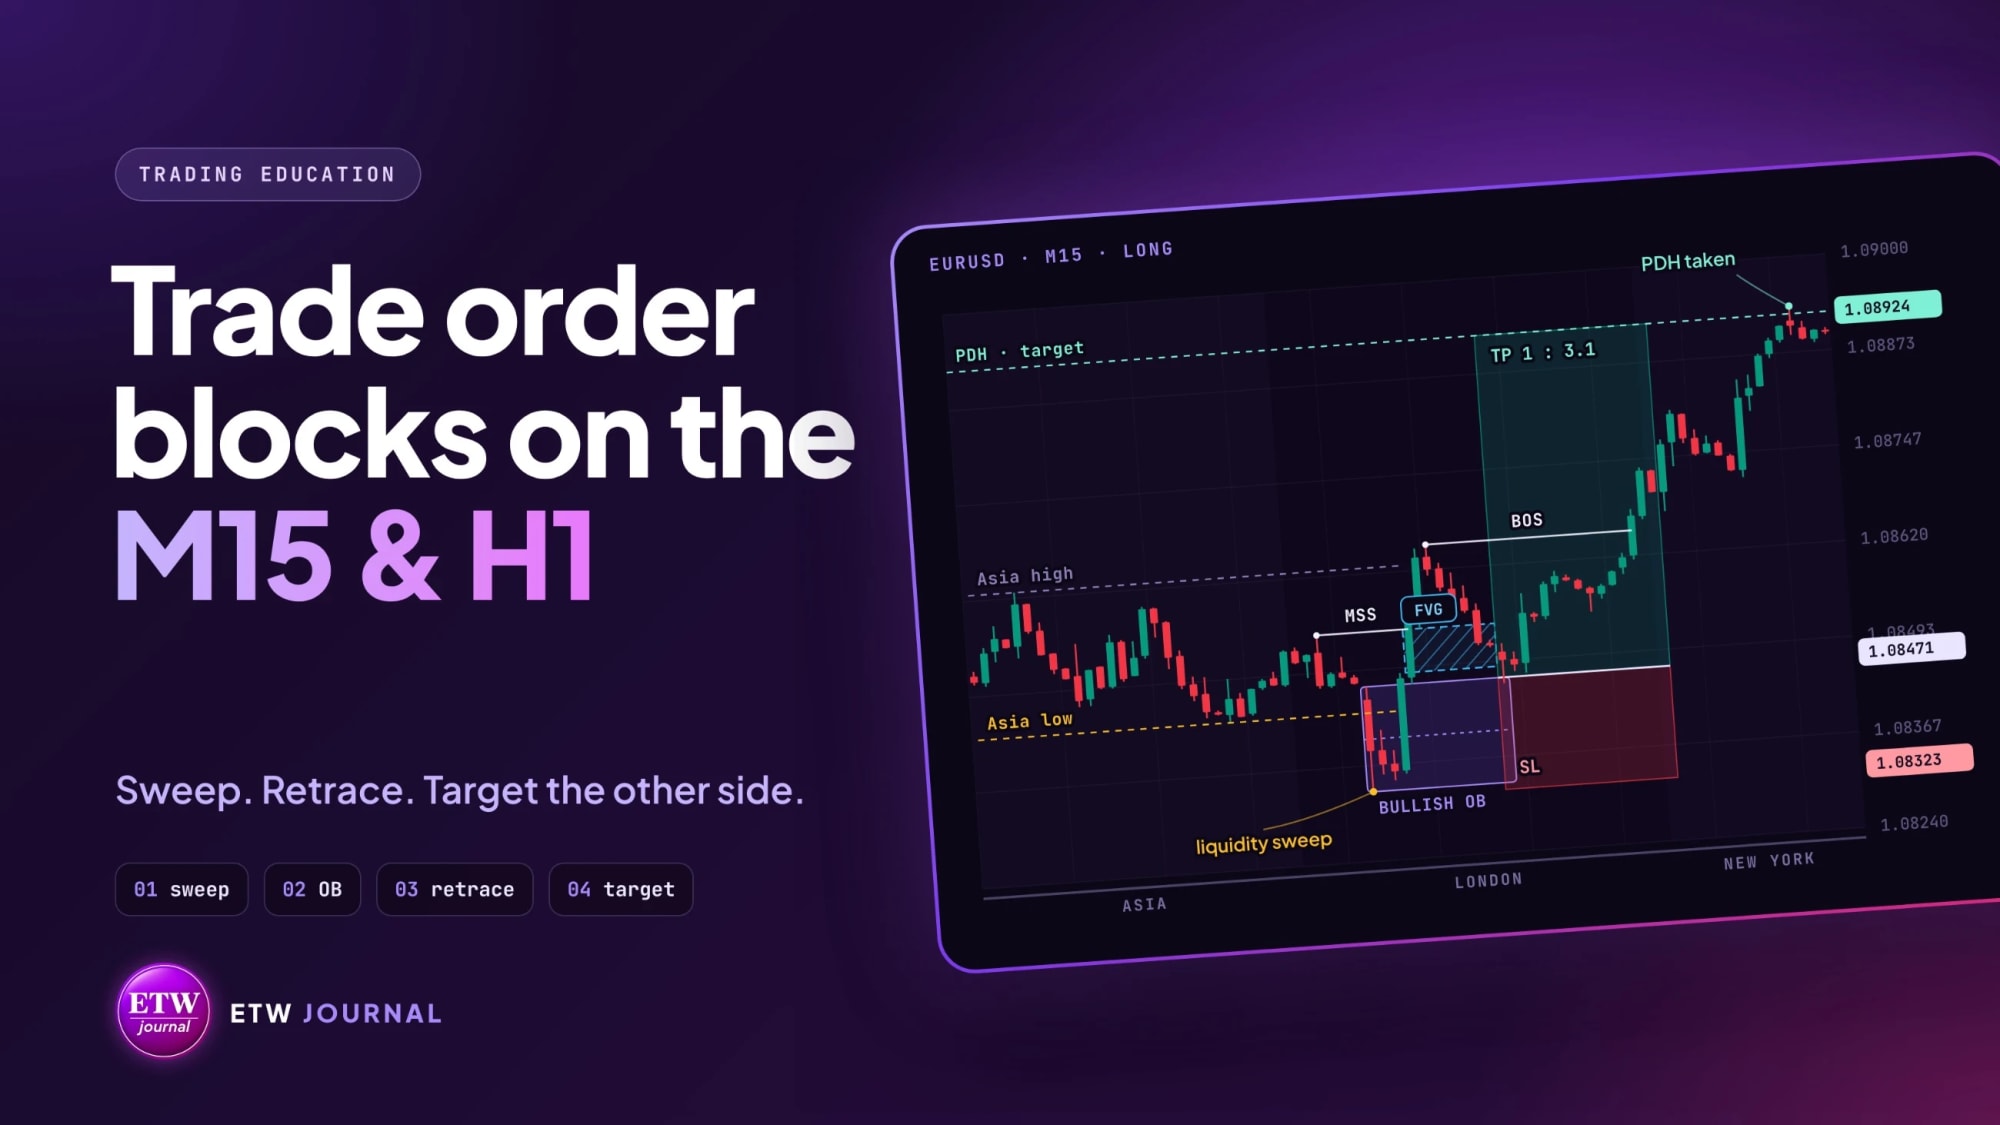
Here is the full model on a long. During Asia, EURUSD builds a range. At the London open price drops under the Asia low, sweeps the sell-side and prints three down-close candles. That series is the bullish OB, roughly 1.08332 to 1.08471.
Price then displaces up, breaks the last lower high for the MSS, leaves an FVG just above the block and runs through the Asia high. On the first retrace, price fills the FVG and touches the top of the block. That is the fill.
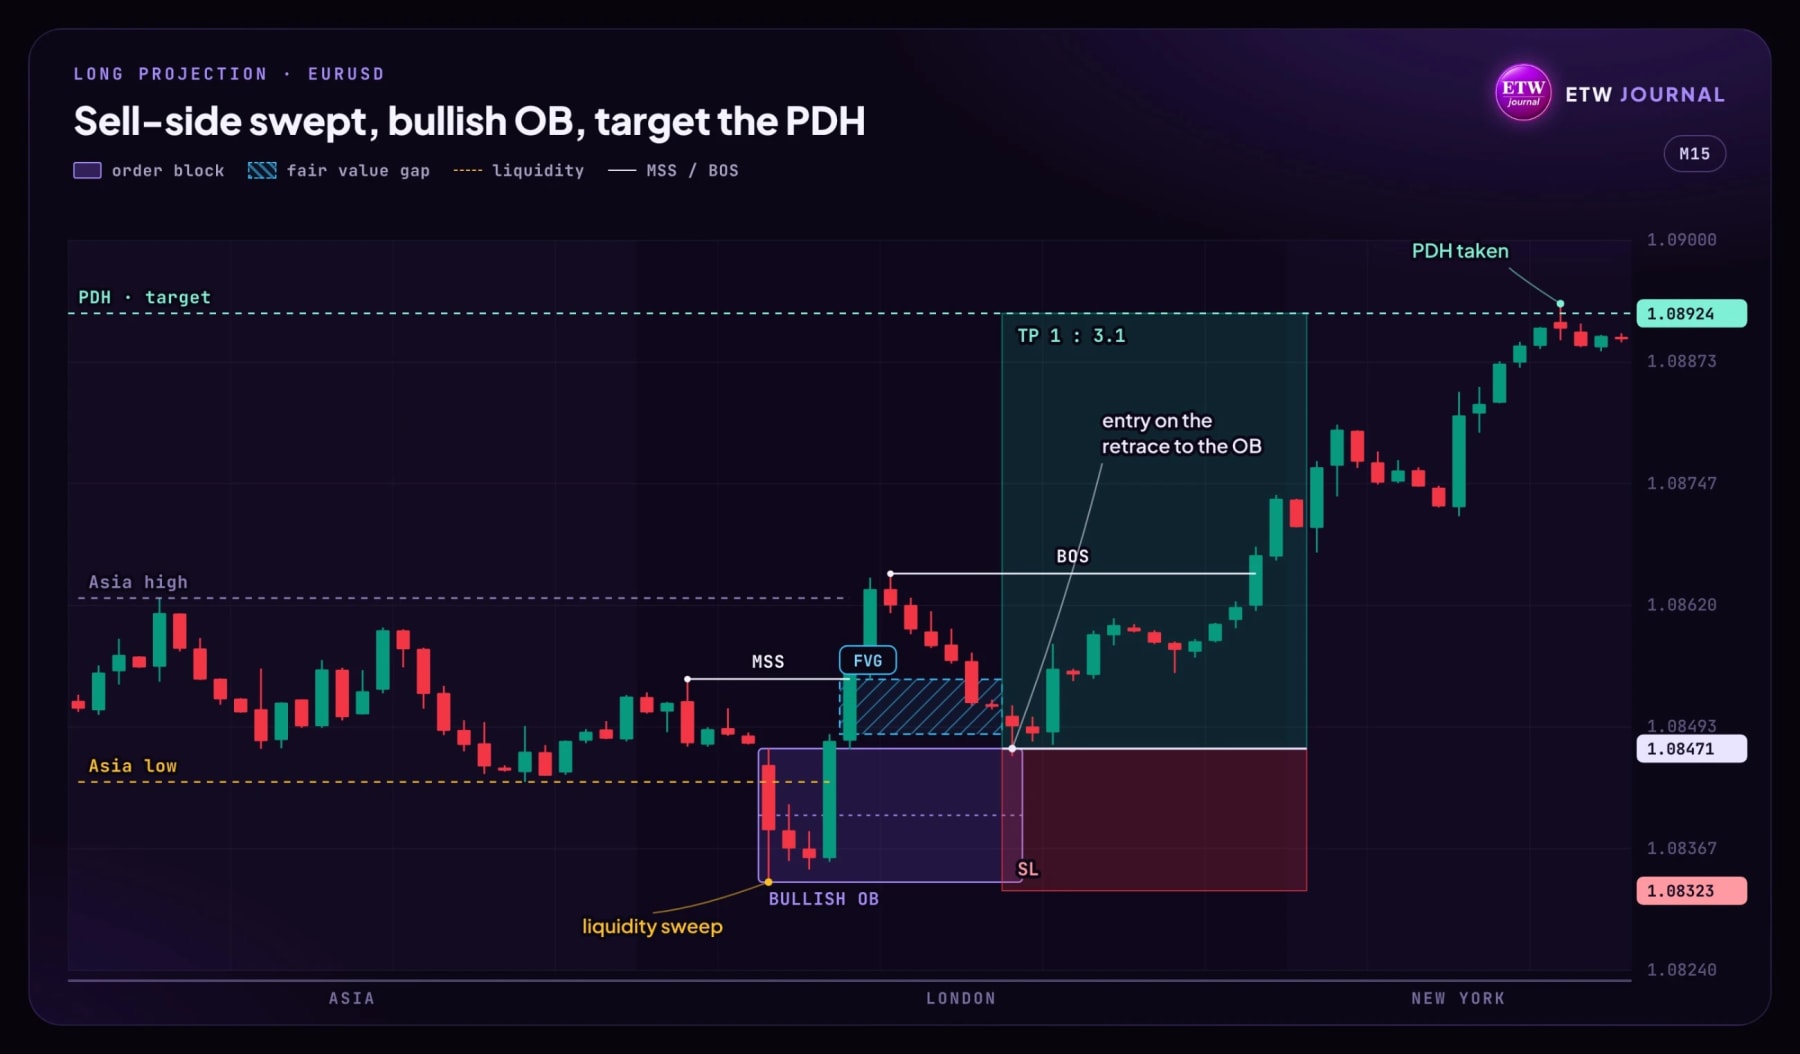
- Entry: 1.08471, the top of the OB
- Stop: 1.08323, just under the sweep low (14.8 pips)
- Target: PDH at 1.08924 (45.3 pips)
- Reward to risk: about 1 : 3.1. With the midline stop at 1.08394 it is closer to 1 : 5.9
Notice that the trade did not go straight to the target. It chopped around after entry, which is normal on M15. The stop was below the sweep, so the chop did not matter.
Short projection: GBPUSD on M15
Now the mirror. London builds a high on GBPUSD. Early in New York, price pushes above it, takes the buy-side liquidity and leaves a series of up-close candles at the top. That is the bearish OB, from about 1.27524 up to 1.27676.
Price displaces down hard, breaks the last higher low for the MSS and leaves an FVG under the block. The retrace fills that gap and taps the bottom of the OB. That is the short. A BOS lower confirms the move before it reaches the Asia low.
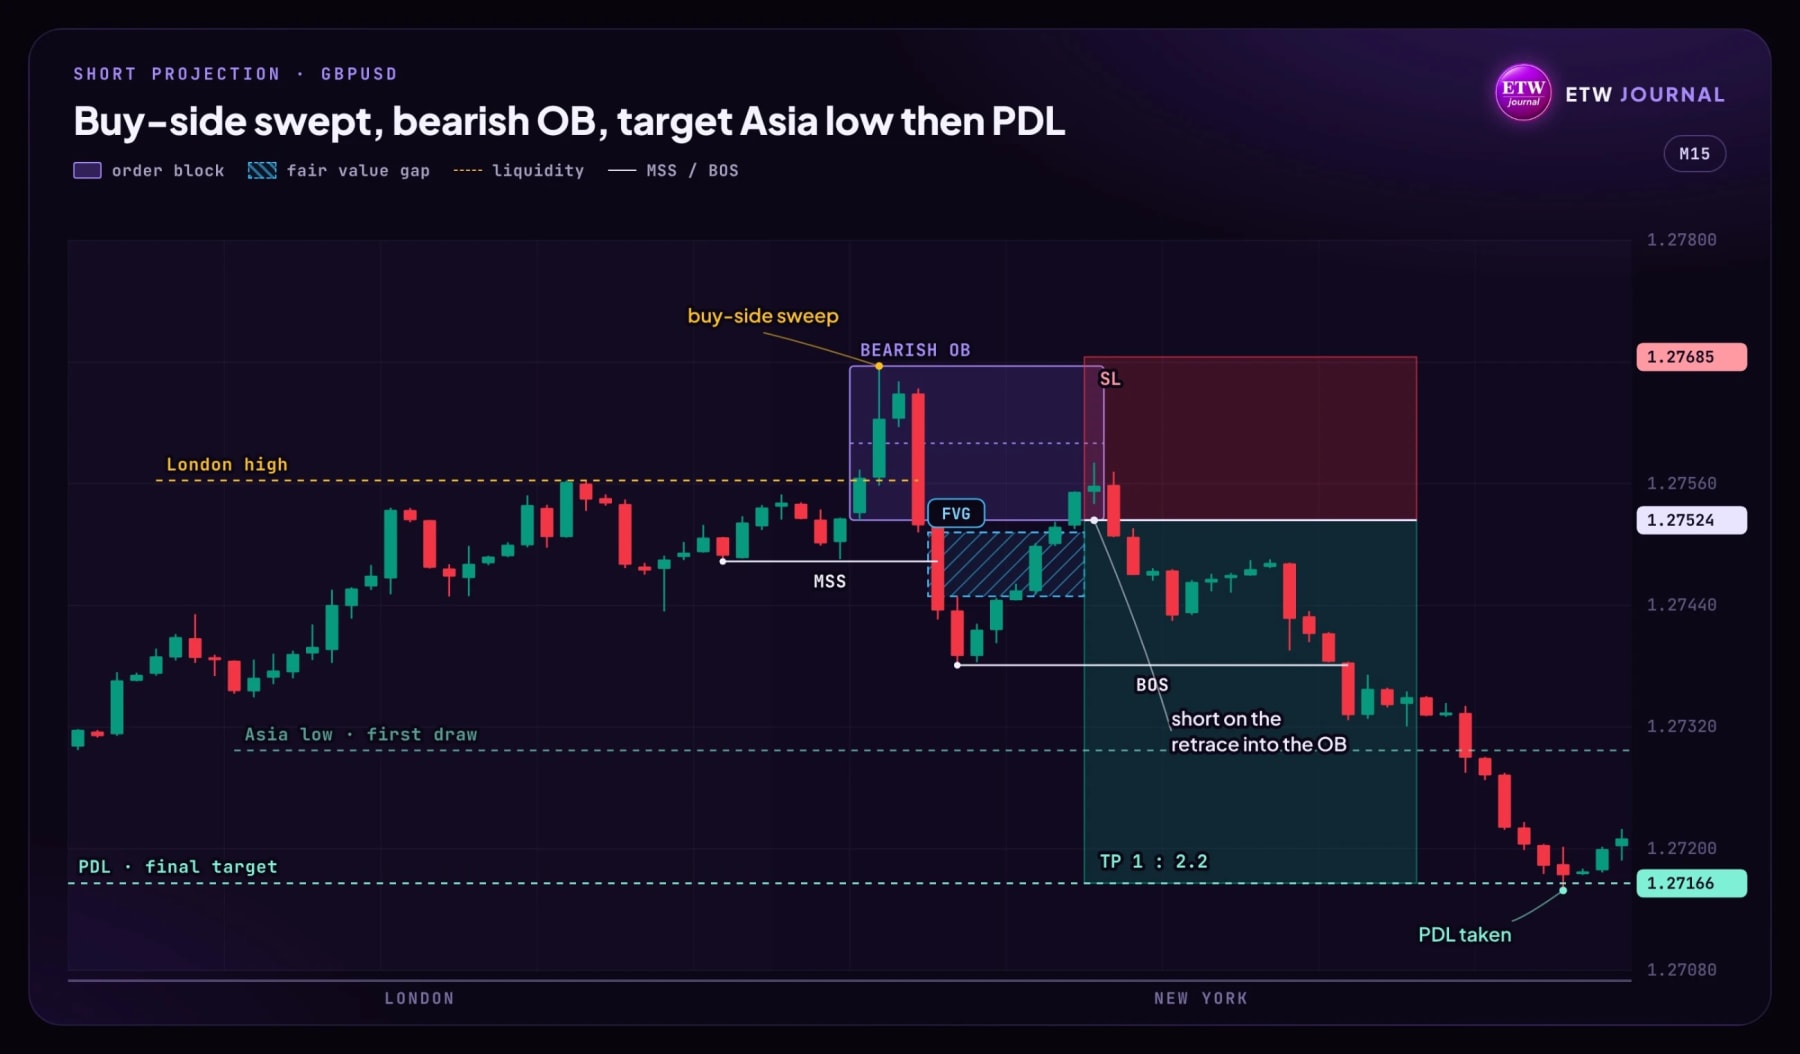
- Entry: 1.27524, the bottom of the OB
- Stop: 1.27685, above the sweep high (16.1 pips)
- First draw: Asia low at 1.27297, a good place for partials
- Final target: PDL at 1.27166 (35.8 pips), about 1 : 2.2
Mistakes that kill this setup
- Marking blocks with no sweep. No liquidity taken, no order block. This is the most common mistake by far.
- Entering before the MSS. Buying the sweep candle itself feels clever until the sweep turns into a breakdown.
- Chasing. If you missed the retrace, you missed the trade. There will be another one tomorrow.
- Targets with no liquidity. Picking a random 1 : 3 is not a target. The level on the other side is the target.
- Moving the stop. Decide between the sweep stop and the midline stop before you enter, and leave it alone.
- Trading every block of the day. One or two clean setups per session is plenty. Quality over count.
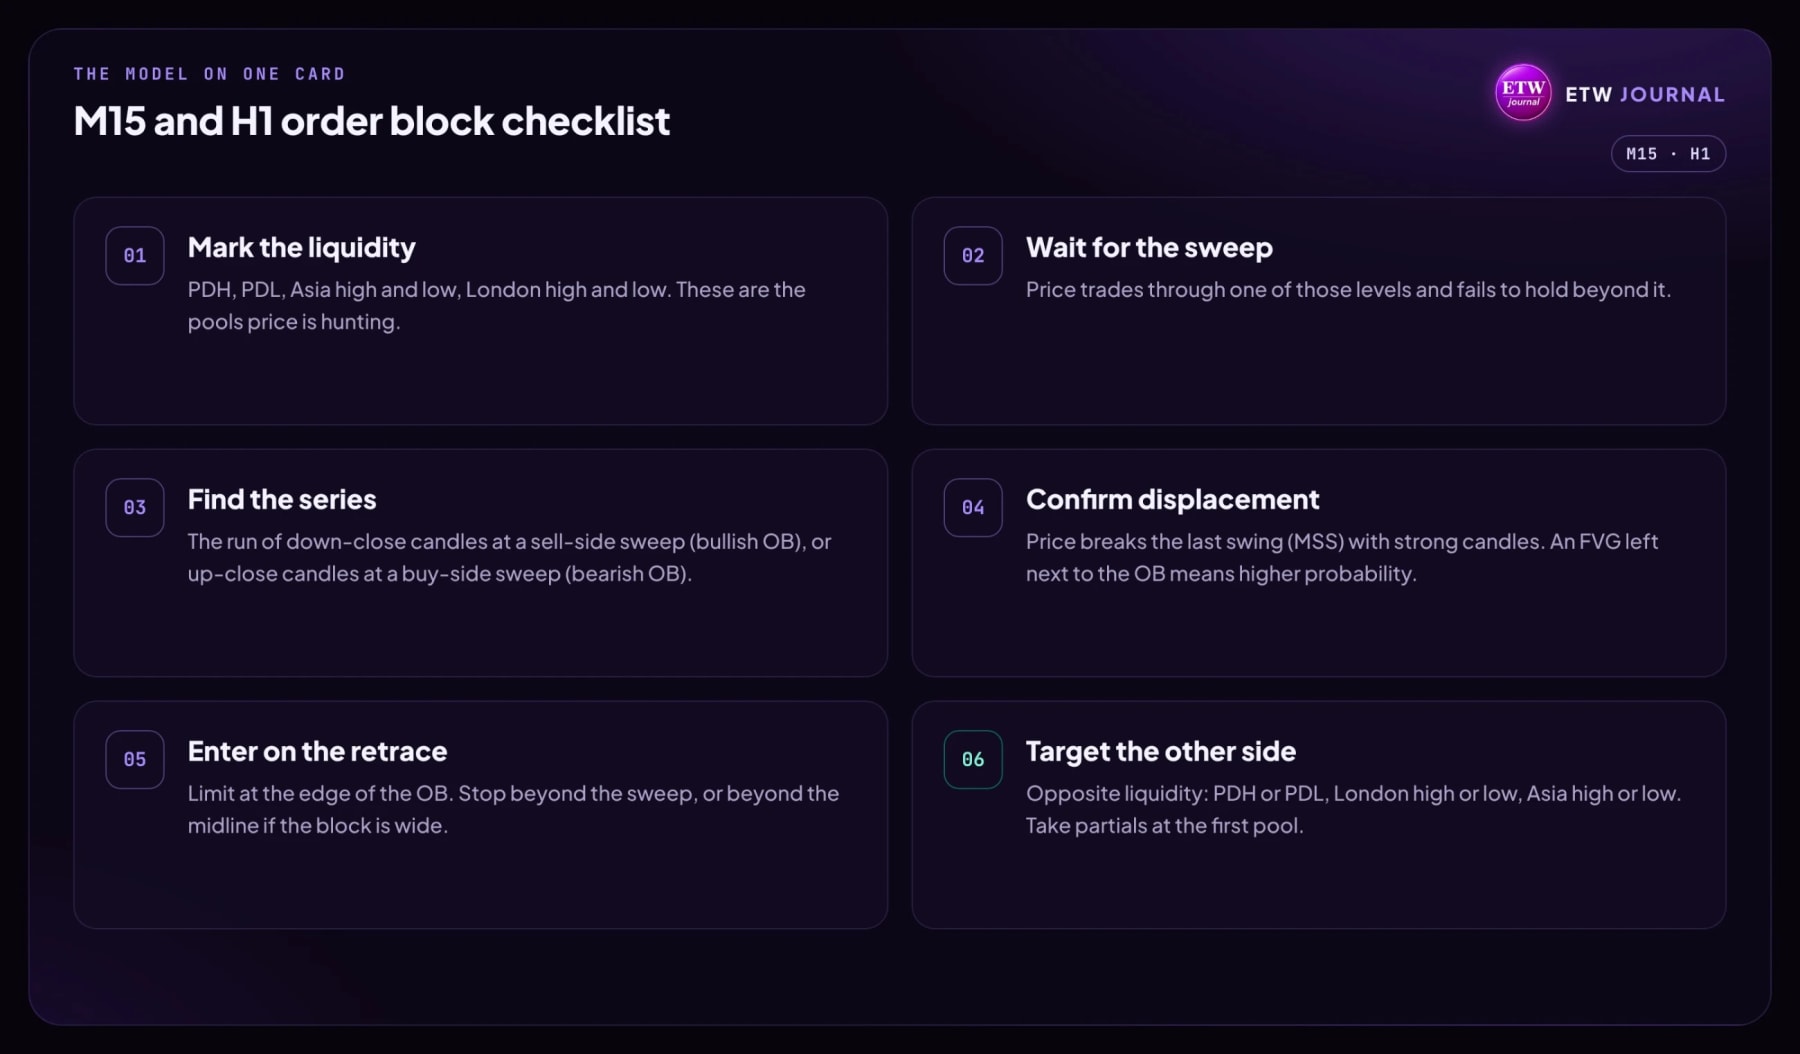
The whole model on one card
Journal it so you know if it works
A model is only as good as your record of it. Every time you take this setup, tag it in ETW Journal with the timeframe (M15 OB or H1 OB), the stop you used (sweep or midline) and the liquidity that was swept (Asia low, London high, PDL and so on).
After 30 to 50 trades, open your tag reports and look for the answers. Do H1 blocks hold better than M15 blocks for you? Does the midline stop actually pay better, or does it just get you stopped more? Do Asia sweeps work better than London sweeps? Your own data will answer these better than any trader on social media.
Before you risk real money, collect the data. Open ETW Journal, go to Backtesting and replay M15 and H1 charts bar by bar. Mark the sweep, the OB, the MSS and the FVG, place the trade with the position tool and log it with your tags. Fifty backtested trades will tell you more about this model than any post can. Then use Trade Replay to check your live entries against the block.
Backtest the order block model in ETW Journal →
Trading carries real risk of loss. The charts in this post are educational examples, not signals or live trades. Test any model on a demo or in backtesting before you put money behind it, and never risk more than you can afford to lose.
Keep it simple. Sweep, series, displacement, retrace, target the other side. Do that well for a few months and you will know more about order blocks than most people who talk about them all day.