 ETW

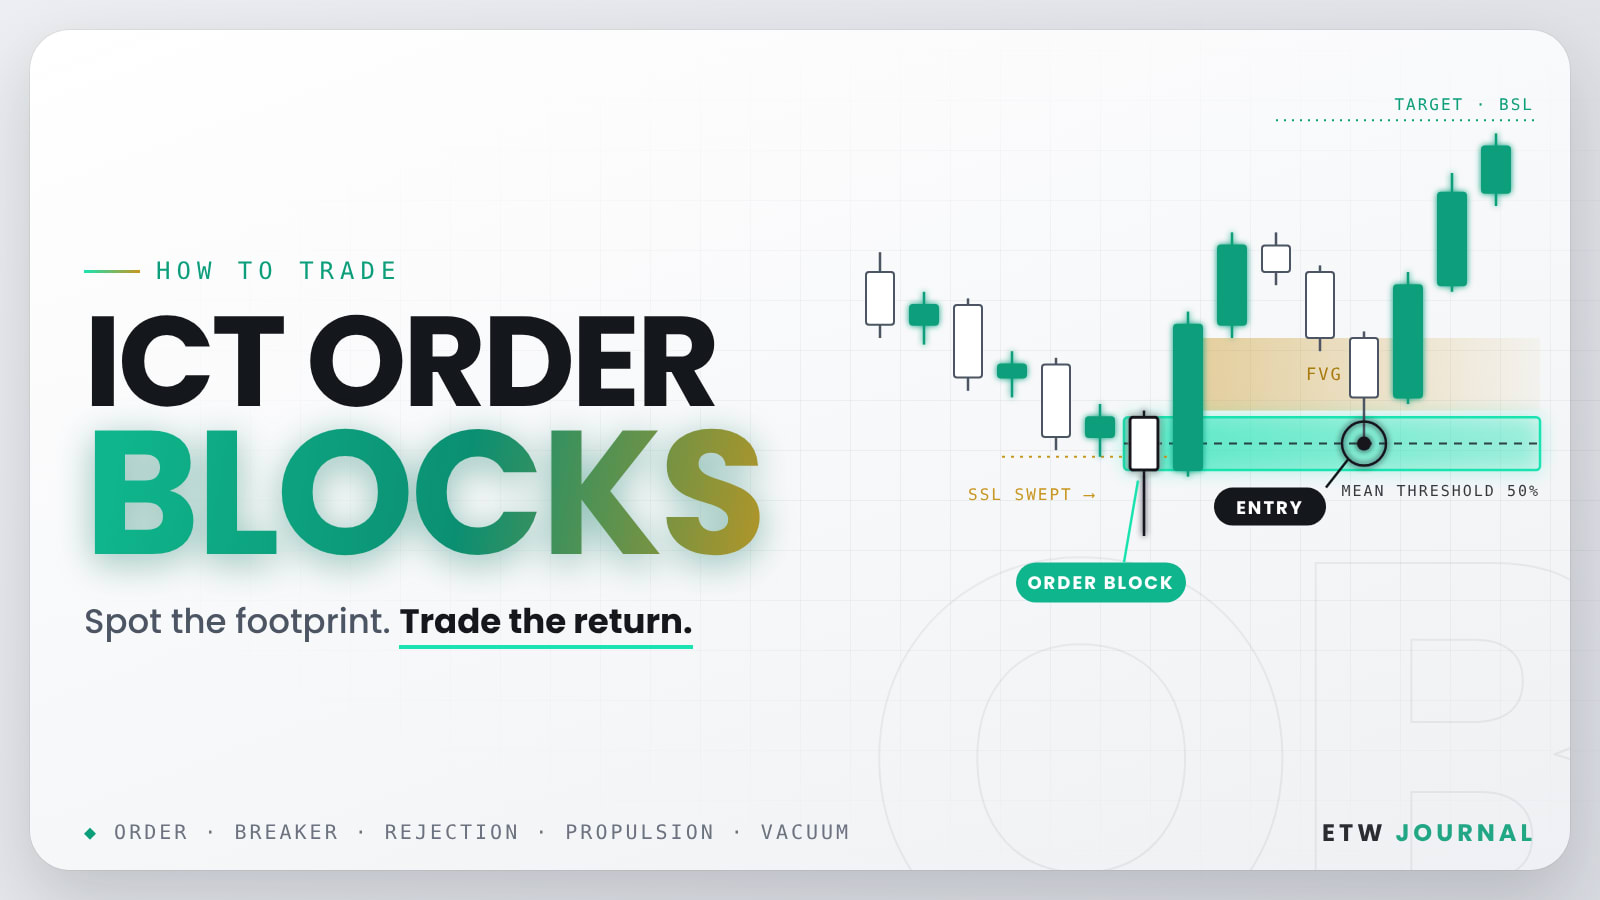
Order blocks are the backbone of ICT and smart money trading. They mark the exact candles where large players committed to a move, and price has a habit of coming back to those candles before it continues. Learn to read them properly and you stop chasing breakouts: you wait for price to return to a level that already proved it matters. This guide covers what an order block really is, how to validate one, where to enter and place your stop, and the four variants every ICT trader should recognise: breaker, rejection, propulsion and vacuum blocks.
What is an ICT order block?
An order block is a change in the state of delivery. Price was being delivered in one direction, a candle (or small group of candles) forms at an important level, and then the market starts delivering in the opposite direction. That candle is the footprint left behind by the order flow that caused the shift.
- A bullish order block is the last down-close candle (or series of down-close candles) before price displaces higher.
- A bearish order block is the last up-close candle (or series of up-close candles) before price displaces lower.
Not every up-close or down-close candle is an order block. Context is what turns an ordinary candle into one. The highest-probability order blocks share three traits:
- They form at a higher-timeframe key level, such as a previous day, week or session high or low, or a higher-timeframe order block or FVG.
- They take liquidity first. A bullish order block usually forms after a sell-side run below an obvious low; a bearish one after a buy-side run above an obvious high.
- They are paired with a fair value gap. The move away from the block is so strong it leaves an imbalance behind, which confirms the change in delivery (often called a CSD, change in state of delivery).
Order blocks are time sensitive. The best ones are fresh and form inside liquidity pools. An old block that price has already traded through several times has lost most of its power.
How to trade a bullish order block
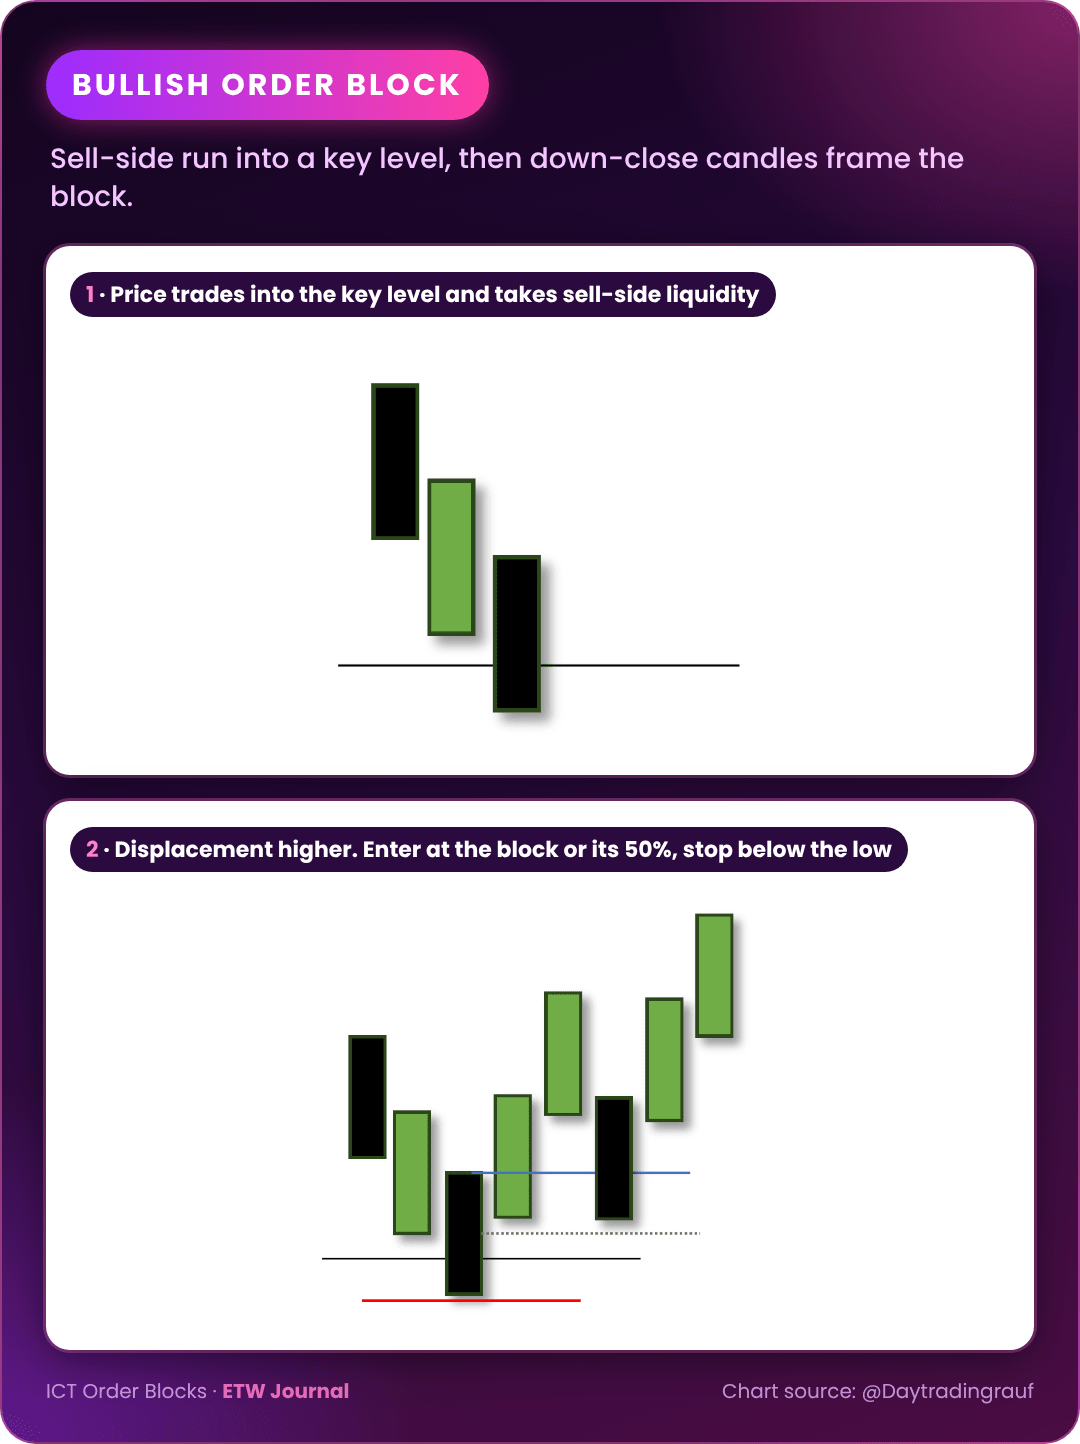
- Mark the higher-timeframe key level where you expect a reaction, for example a previous daily low.
- Wait for price to trade into it and take sell-side liquidity, running the stops resting below the lows.
- Watch for displacement higher. Price should leave the level quickly, ideally creating a fair value gap.
- Frame the order block using the down-close candle(s) right before the move up.
- Enter on the return, either at the open/close of the block or at its mean threshold (the 50% level of the block).
- Place your stop below the low of the order block candle. Target the next pool of buy-side liquidity above.
How to trade a bearish order block
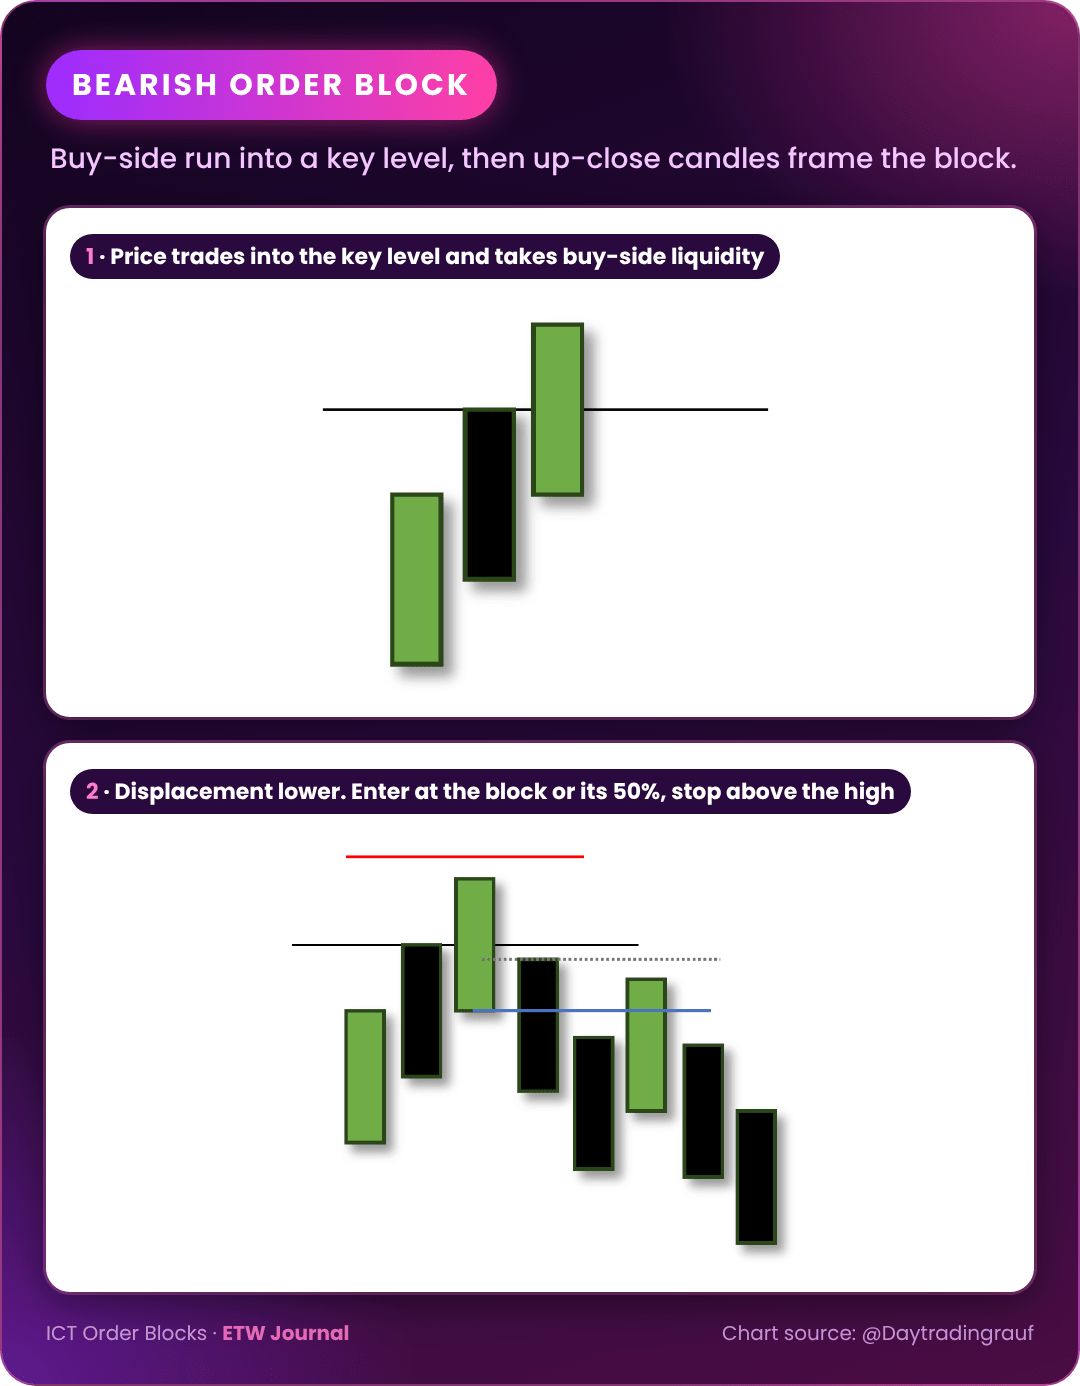
The bearish version is the mirror image. Price trades into a higher-timeframe key level, runs the buy stops above an obvious high, then displaces lower. The up-close candle(s) before that drop form the bearish order block. Enter when price returns to the block or its mean threshold, place your stop above the high of the order block candle, and target sell-side liquidity below.
How to validate an order block
The single best test is how price behaves at the mean threshold. If price touches the 50% level of the block and is in a hurry to leave, the block is valid and the change in delivery is real. If price lingers, chops through it or closes beyond it, the block has failed. Do not trade it.
Trust the bodies, not the wicks. When you frame an order block and its mean threshold, focus on the candle bodies. Bodies show where the market actually agreed on price; wicks are often just liquidity being taken.
Breaker blocks: when an order block fails
A breaker block is an order block that failed and then flipped. It follows the same principles as a normal order block (key levels and liquidity), but the sequence is different:
- Bullish breaker: price takes sell-side liquidity below a low, then rallies through the high that formed before the sweep. The last up-close candle(s) that led into the sweep become support. When price retraces into that zone, look for longs.
- Bearish breaker: price takes buy-side liquidity above a high, then drops through the low that formed before the sweep. The last down-close candle(s) before the sweep become resistance. When price returns to that zone, look for shorts.
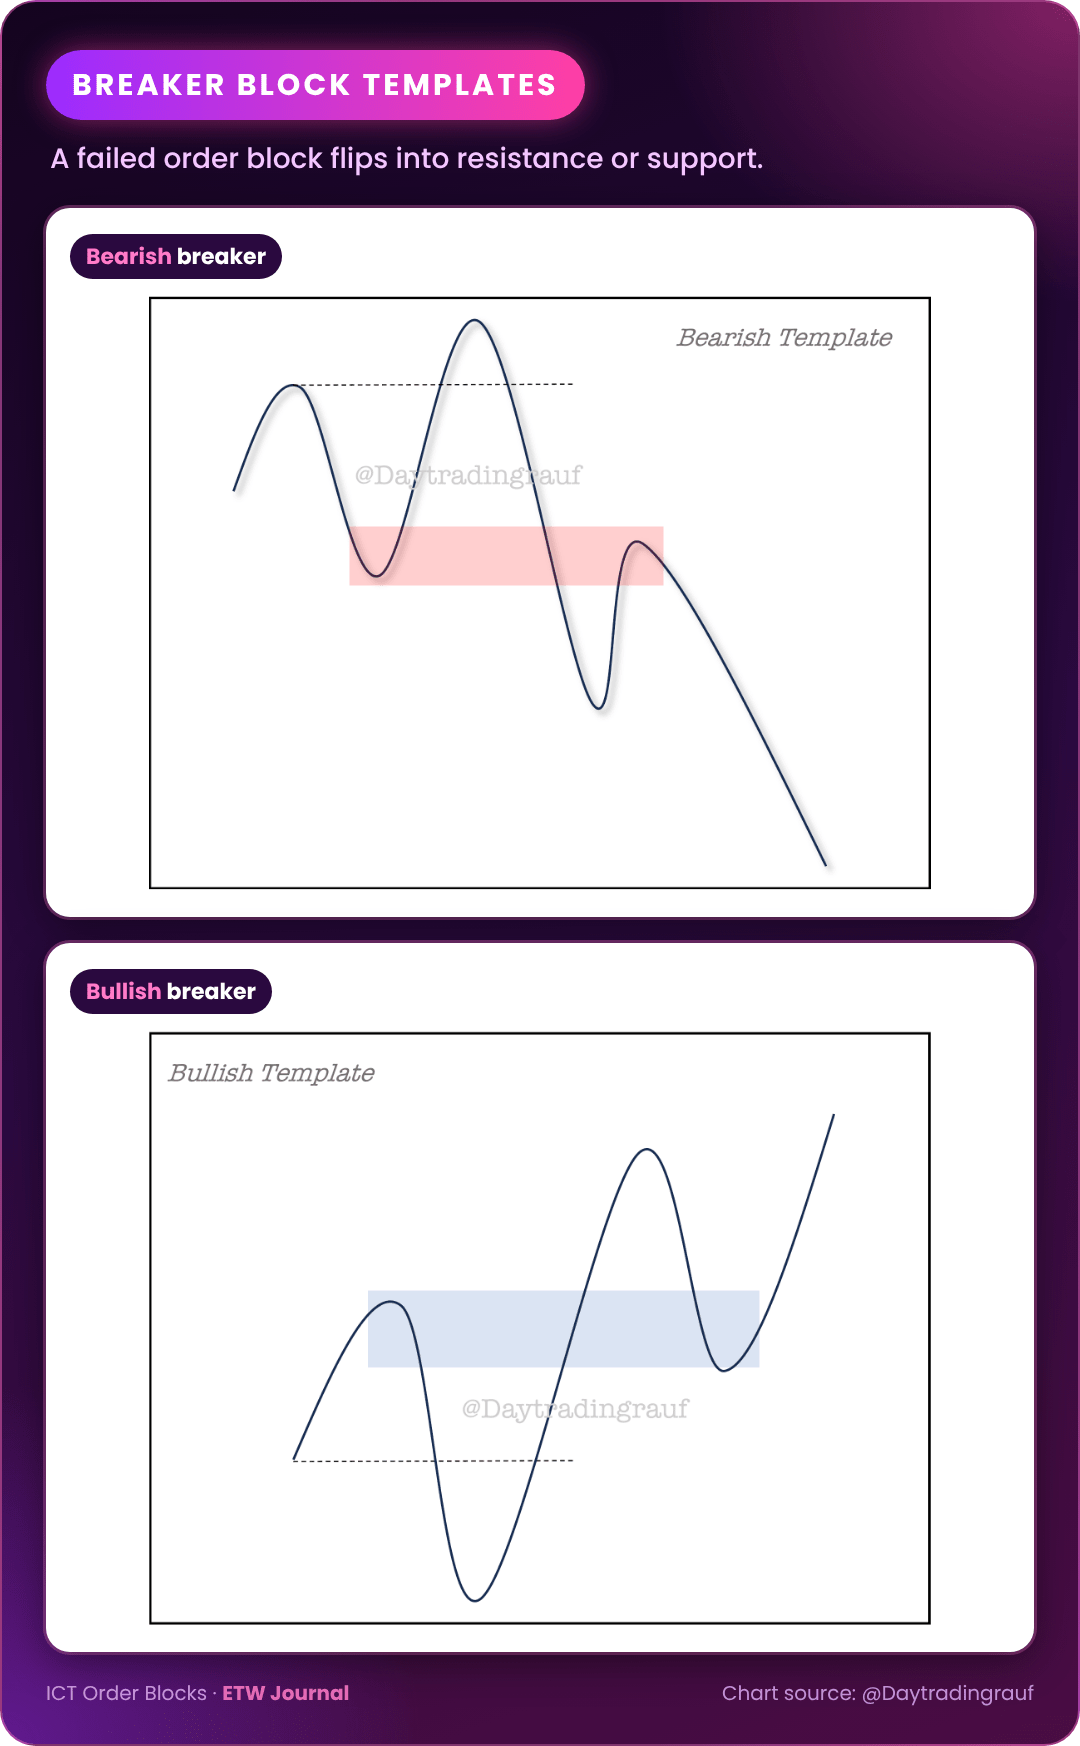
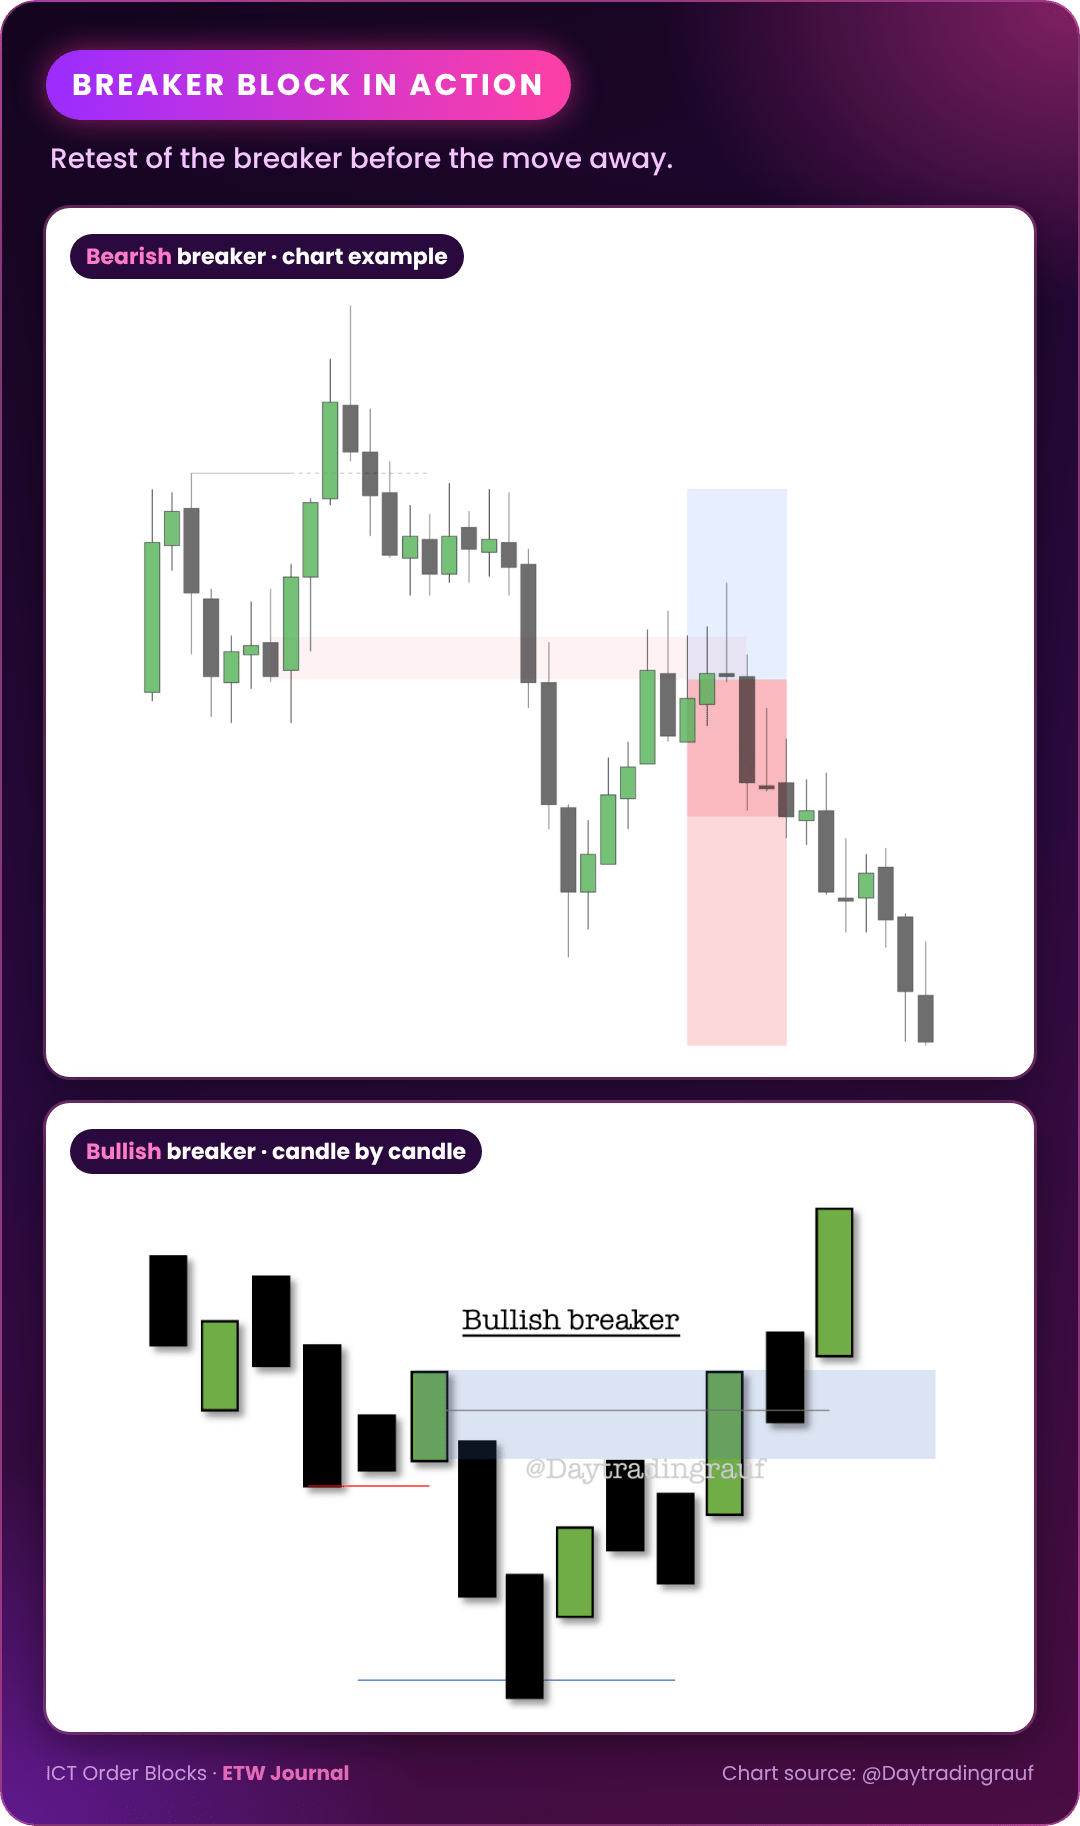
Breakers are powerful because they trap traders on the wrong side. Everyone who bought the original order block is now underwater, and their exits fuel the move away from the breaker.
Rejection blocks: using wicks as a reference
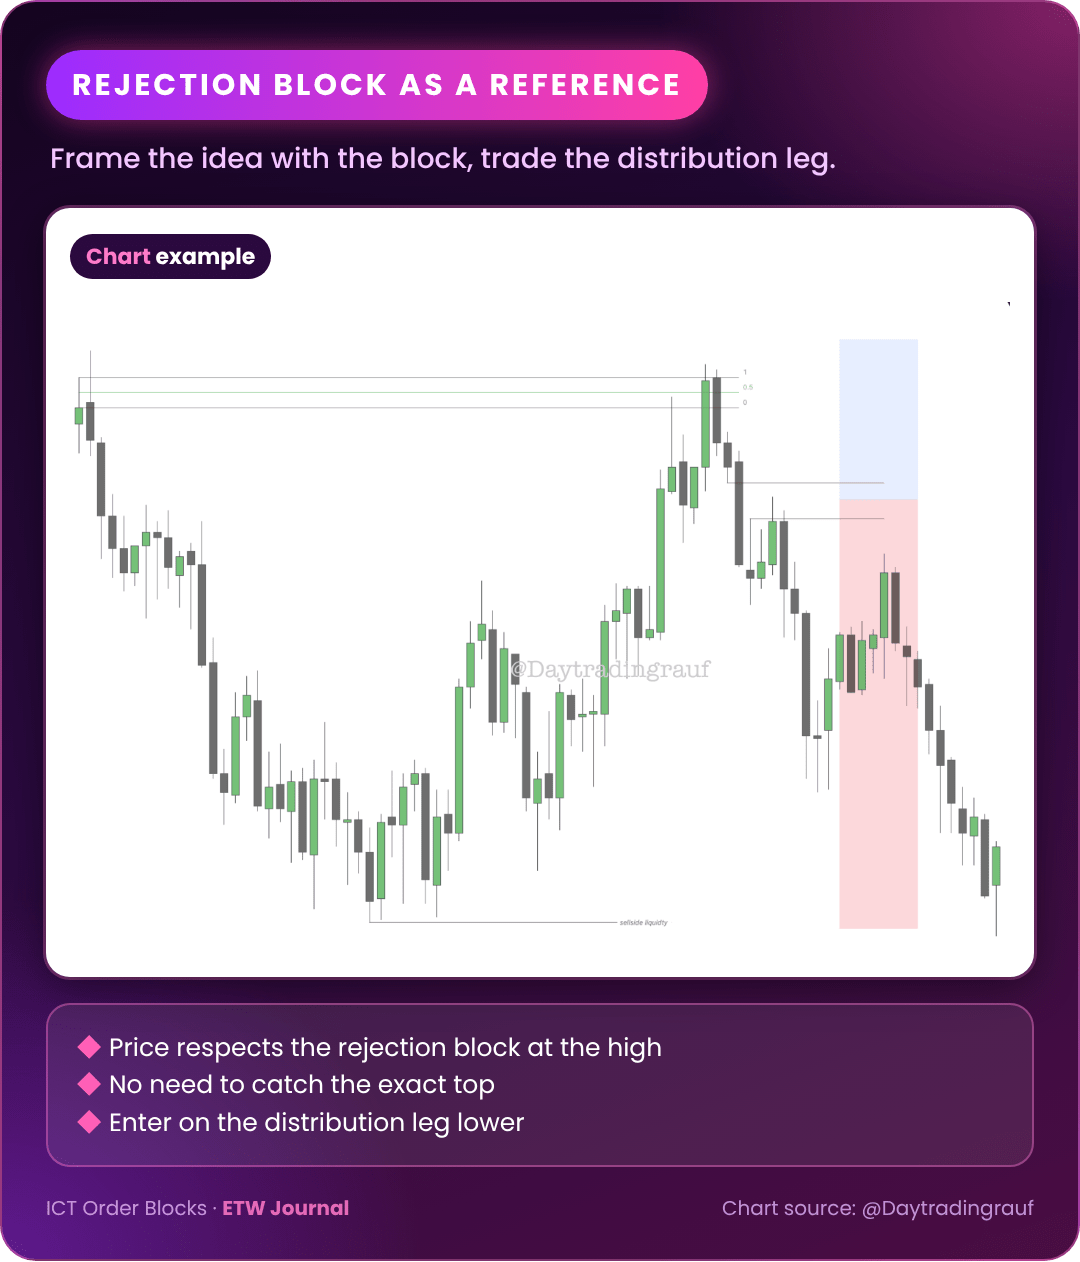
A rejection block forms when a high or low is built with long wicks: price runs the liquidity resting beyond the candle bodies, then reverses. In a bearish rejection block, the wicks form on the highs; in a bullish one, they form on the lows.
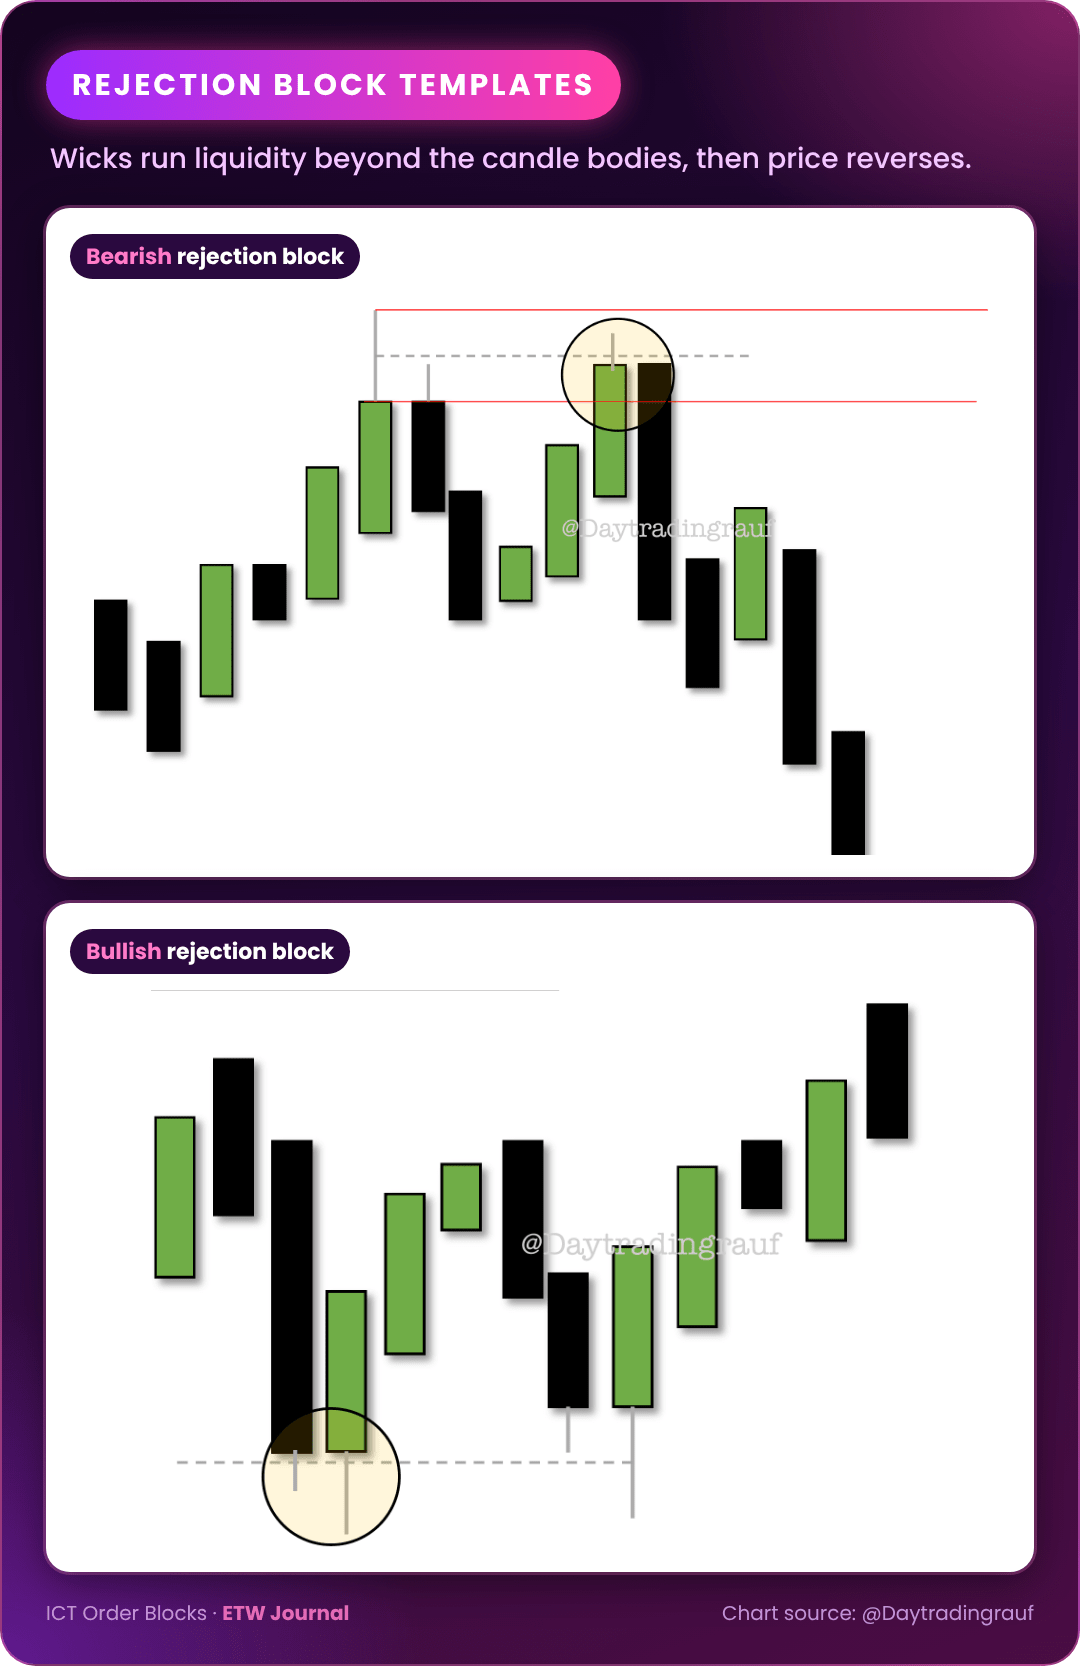
The simplest way to use them is to treat rejection blocks like normal order blocks. But the practical lesson is this: you do not need to catch the exact top or bottom. Once price respects the rejection block, use it as a reference and look to trade the distribution leg that follows.
Propulsion blocks: the fastest setups
Propulsion blocks are many traders' favourite variant because of the speed of the move they produce. Here is how one forms in a bullish scenario:
- Opposing liquidity is run (ideally sell-side liquidity is taken first).
- Price creates an order block, then trades back into it and respects it.
- The next down-close candle that forms on that bounce becomes the propulsion block.
- Price can return to the propulsion block, and the ideal reaction areas are its high and mean threshold, before it is repelled away.
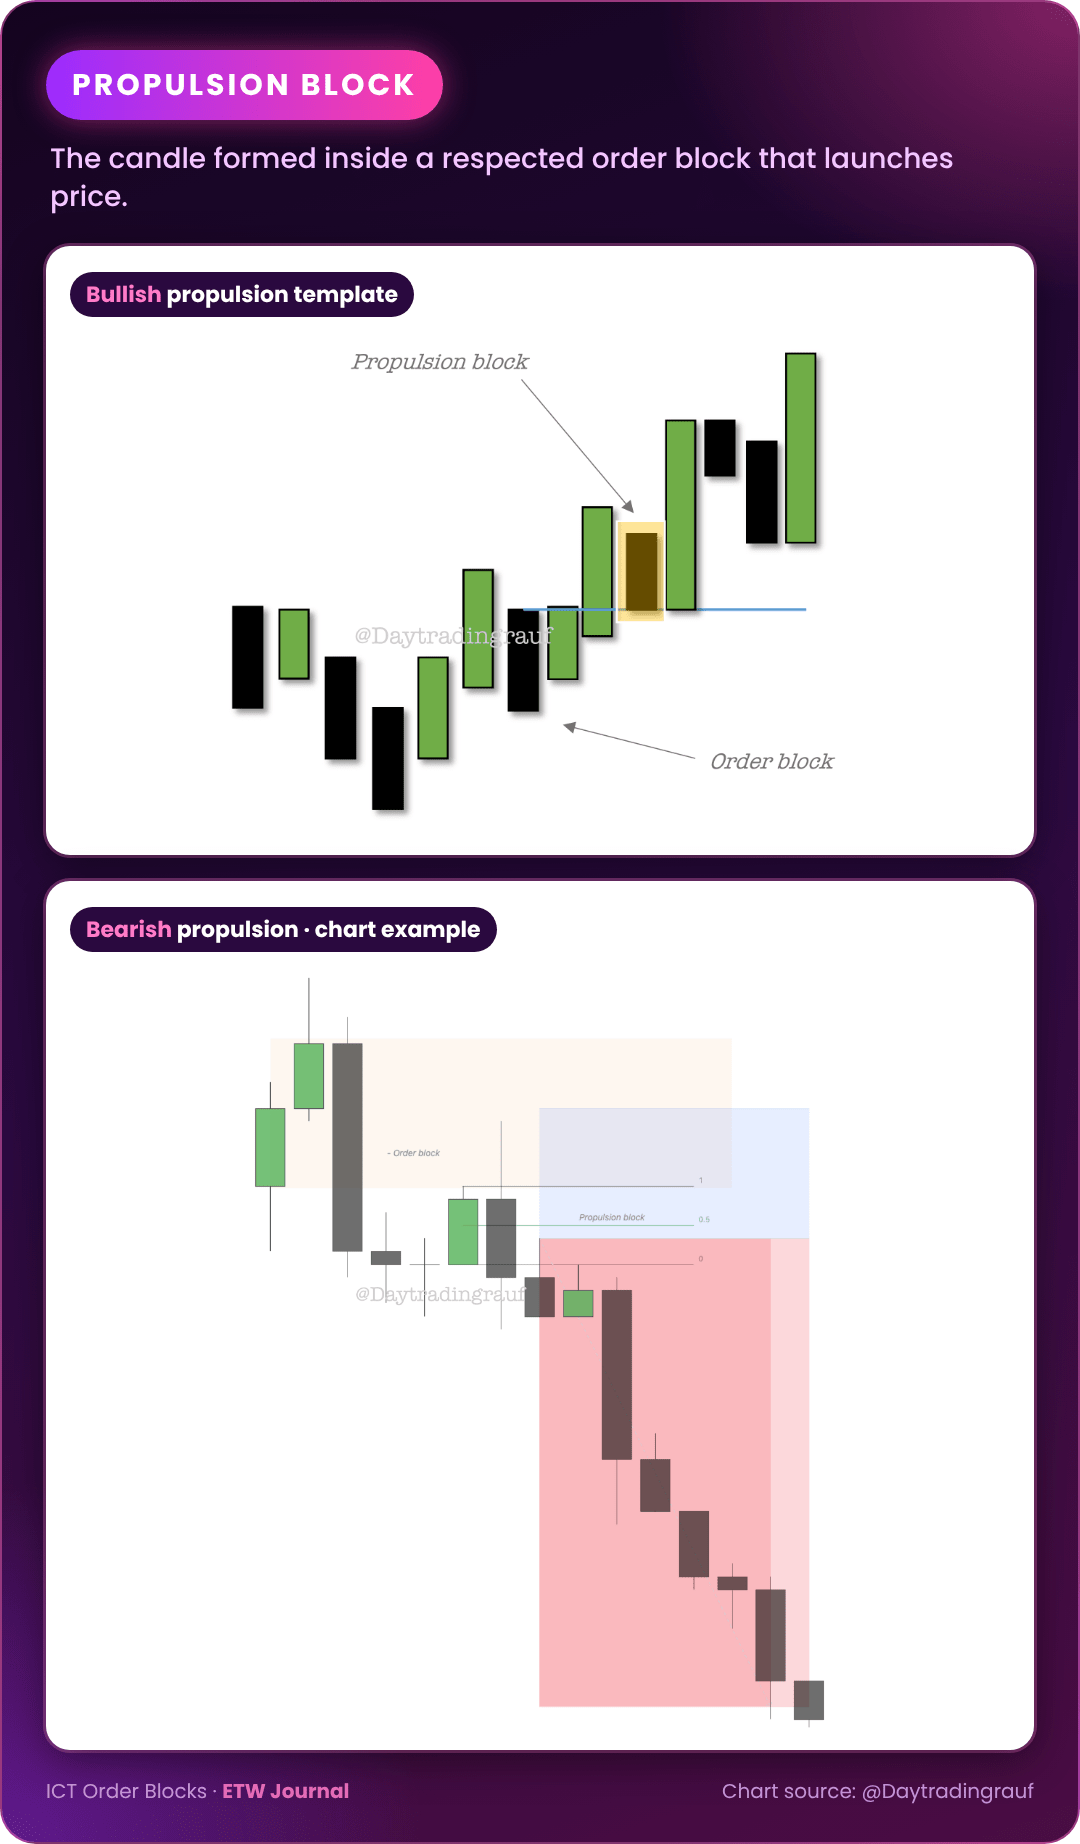
In a bearish setup it is the reverse: the up-close candle that forms after price respects a bearish order block becomes the propulsion block, and the ideal areas are its low and mean threshold.
Vacuum blocks: gaps caused by news
Vacuum blocks are less of an entry tool and more of a map reference. They form when price gaps up or down after a high-impact news event such as FOMC, CPI or NFP. The gap is an absence of liquidity, a vacuum, and the algorithm tends to want to trade back into it.
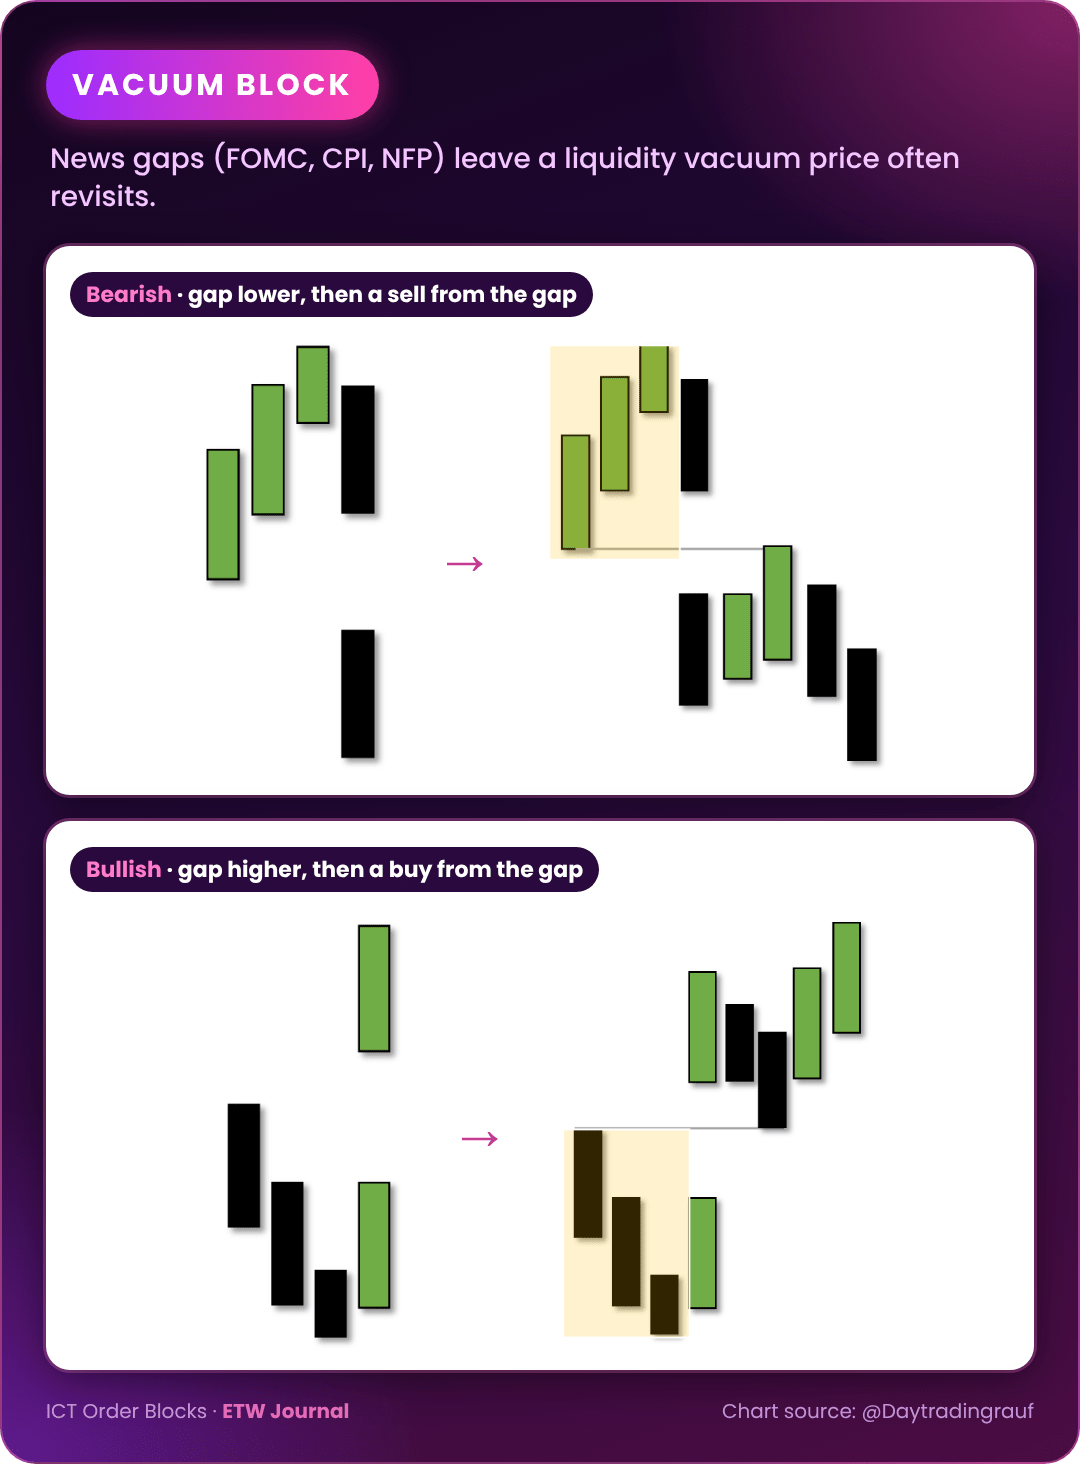
- Bearish vacuum block: price gaps lower; watch the gap as a potential selling area when price trades back up into it.
- Bullish vacuum block: price gaps higher; watch the gap as a potential buying area when price trades back down into it.
Most traders do not trade vacuum blocks directly, but knowing where they sit helps you frame a trade idea and avoid getting caught on the wrong side of a gap fill.
Order block cheat sheet
- Order block: last opposite-close candle before displacement from a key level. Enter at the block or its mean threshold; stop beyond the candle.
- Breaker block: a failed order block after a liquidity sweep and break of structure. Trade the retest.
- Rejection block: wicks run liquidity beyond the bodies. Use it as a reference for the distribution leg.
- Propulsion block: the candle formed inside a respected order block. Watch its high/low and mean threshold.
- Vacuum block: a news gap that price tends to revisit. Use for context, not blind entries.
Common order block mistakes: marking every opposite-close candle as an order block, ignoring whether liquidity was taken first, trading blocks with no fair value gap or displacement, holding on when price closes through the mean threshold, and forgetting the higher-timeframe bias. Always use a stop.
Track your order block trades in ETW Journal
Order blocks look obvious in hindsight and much harder in real time. The fix is data. In ETW Journal, tag each trade with the block type (order, breaker, rejection, propulsion), whether liquidity was taken first, whether there was an FVG, and whether you entered at the block edge or the mean threshold. Attach a screenshot with the block marked. After a few weeks your analytics will show which variant and entry style give you the best win rate and R multiple, and you can drill the setups bar by bar in Trade Replay and the backtesting workspace before taking them live.
Charts and templates in this guide are from the ICT Order Block guide by @Daytradingrauf.